Before specifying your tax settings in agrē, you must first add your taxes using the Manage Taxes window.
What you'll find:
Each tax that you add contains information that applies to both your AR and AP: the tax name, code, rate, and rate type (percentage or flat rate). Other information applies only to your AR: the GL account, if the tax is discountable, the tax on tax settings, and if the tax should apply by default to all your locations, customers, and products.
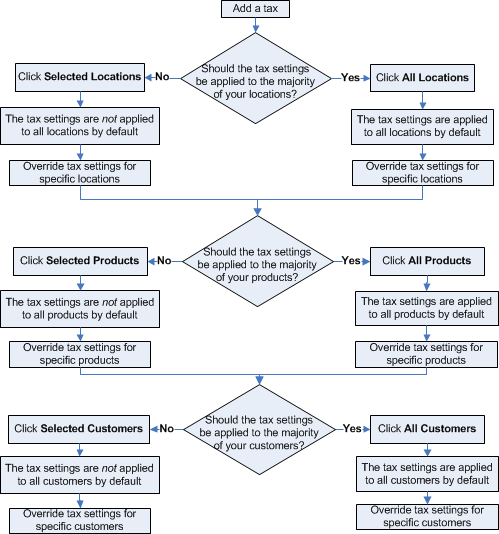
Whether or not a tax should apply by default to all your locations, customers, and products depends on the most common way your business uses the tax.
Ask yourself the following questions:
Is this tax applicable at most of my locations?
Is this tax applicable for most of my products?
Is this tax applicable for most of my customers?
If the answer is Yes to any of the above questions: The default setting should be to apply this tax to all locations, products, or customers. You would select “all locations,” “all products,” or “all customers.” This tells agrē to use the specified default tax settings automatically for all your locations, products, or customers. Any location, product, or customer that should not be charged this tax can be set up as an exception to the default (i.e., you can override the default settings for a specific location, product, or customer).
If the answer is No to any of the above questions: The default setting should be to apply this tax to selected locations, products, or customers. You would choose “selected locations,” “selected products,” or “selected customers.” This tells agrē to make all locations, products, or customers exempt from this tax. Any location, product, or customer that should be charged this tax must be set up individually (i.e., you can override the default settings for a specific location, product, or customer).
Note
All new locations, products, and customers added follow the default settings you choose. For example, if you selected “all locations,” then all new locations added are automatically charged the default tax. However, if you chose “selected locations,” then all new locations added are automatically exempt from the default tax.
The following flowchart summarizes the “all” and “selected” settings.
After adding taxes, you can then specify your AR and AP tax settings (overrides).
Adding Taxes
You can add all the taxes you require for your business.
To add a tax
* indicates a required field (other fields are optional)
Navigate to File > Manage > Taxes.
The Manage Taxes window opens.
Click Add.
The Add Tax window opens.
In the Tax Code* box, enter the tax abbreviation.
For example, “GST”.
Ensure the Active checkbox is checked.
It will be checked by default when adding a new tax.
In the Description* box, enter the tax name.
For example, “Government Sales Tax”.
In the Default Rate* box, enter the tax rate.
Tax rates can be positive or negative (i.e. a rebate). Tax percentages can be entered with or without a decimal. For example, “5” and “.05” are both understood as “5%”.
You can enter a negative Default Rate for a rebate such as for the AFFB (Alberta Farm Fuel Benefit).
Environmental Handling Charges (EHC) can also be setup as mandatory Associated Products and flagged as Deposits.
Select whether the tax is a percentage tax (like GST, PST or HST) or a flat rate tax (like an environmental handling charge).
Once the tax has been used, this setting cannot be changed.
In the AR Default GL Account* box, enter a GL account for the tax to be posted to.
Tip
Since this is a new tax, you may want postings to go to a new GL account. Click Add to add one.
In the Registration # box, enter the tax registration number (when applicable).
The registration number displays in all related reports.
Enter an External Tax Code (if applicable).
External Codes are required when interfacing with software external to your agrē database.
Select the Is Discountable? check box if you want to allow any applicable early payment discounts on this tax.
This has an effect only if you use early payment discounts. If this check box is selected, then this tax is eligible for an EPD when the suggested discount amount is calculated.
Select the AP: Post tax amount to Expense Account check box if you want to post the tax for an AP non-inventory purchase to the same GL account as the purchased product.
For example: when you add a PI for a phone bill, if you'll want the PST to post to the Telephone Utilities account, check the box.
In the Calculate this tax on the following taxes section, enter the Other Tax(es) that this tax is charged on top of.
For example, if this tax is GST, then it may be charged on top of PST. This setting is only applicable in your AR and not your AP.
Tip
Click Remove Tax On Tax to remove a tax from the list.
In the Tax Type section, select one of: GST/HST, PST, Other, Commodity Levy (available only when the Grain module is active).
Only one tax can be specified as GST/HST.
Select All Locations or Selected Locations.
If you select All Locations, the specified default tax settings are automatically applied to all your locations. You can, however, override the default settings for selected locations. If you select Selected Locations, the specified default tax settings are not applied to all your locations but rather the settings specified for each of your locations. You can, however, override your specific settings and use the default settings for selected locations.
Select All Products or Selected Products.
If you select All Products, the specified default tax settings are automatically applied to all your products. You can, however, override the default settings for selected products. If you select Selected Products, the specified default tax settings are not applied to all your products but rather the settings specified for each of your products. You can, however, override your specified settings and use the default settings for selected products.
Note
Flat rate taxes must be specified manually to selected products only, and cannot be applied to all products by default.
Select All Customers or Selected Customers.
If you select All Customers, the specified default tax settings are automatically applied to all your customers. You can, however, override the default settings for selected customers. If you select Selected Customers, the specified default tax settings are not applied to all your customers but rather the settings specified for each of your customers. You can, however, override your specific settings for selected customers.
Click Save.
Editing Taxes
Use the Edit Tax window to change existing taxes.
Edits cannot be made in the following cases:
The rate type (percentage or flat) cannot be changed if this tax has been or is being used.
The Registration # cannot be changed if the tax flagged as Is GST/HST? has been or is being used.
Note
Default settings can be changed (locations, products, customers); however, any overrides specified (on the Manage AR and AP Taxes window) are automatically removed.
To edit a tax
Navigate to File > Manage > Taxes.
The Manage Taxes window opens.
In the Tax list, select the tax to edit and then click Edit.
The Edit Tax window opens.
Edit the data as needed.
You can change just the active status.
Click Save.
Deactivating and Activating Taxes
When you add a tax, the default setting is active, but you can deactivate an active tax or activate a tax that has been deactivated.
After a tax is deactivated it will still be referenced on existing items, but cannot be used on new items.
To deactivate or activate a tax
Navigate to File > Manage > Taxes.
The Manage Taxes window opens.
From the Tax list, select the tax of which you wish to change the status and then click Edit.
The Edit Tax window opens.
Set the status of the Active check box as appropriate.
Click Save.
Deleting Taxes
Use the Manage Taxes window to delete a tax. Once you delete a tax, it cannot be undone. You cannot delete taxes that have been used or are in use in agrē.
To delete a tax
Navigate to File > Manage > Taxes.
The Manage Taxes window opens.
From the Tax list, select the tax to delete and then click Delete.
Note
If the Delete button is not available, the tax you selected cannot be deleted.
Click Yes to confirm the deletion.
The tax is deleted.