You can export AgCollect EMR information and Chemical sales data, and there are custom exports for other types of data. You can also export the data from any agrē report.
Once you've created an export file, you can open it in Microsoft Excel, or in any other program that can read text, comma separated value (CSV), or Excel (XLS) files.
Note
If you are a hosted retailer and run agrē over the internet, please review the section on Selecting a Destination for Exported Files at the bottom of this page before exporting your data.
What you'll find:
I want to read the white paper (with screen shots) on how to run the AgCollect Export.
I want to read the white paper (with screen shots) on how to run the Chemical Sales Summary Export.
I want to see an example (with screen shots) of exporting addresses to print customer mailing labels.
Exporting AgCollect EMR Information
If your company provides sales information to AgCollect, you can easily export and email the EMR information you have recorded in agrē by following the instructions below.
- or -
You can setup an automated export that sends your sales data directly to them - please contact your CSC to get the process started. Follow the customer and product setup instructions as detailed in the AgCollect white paper to make sure agrē is sending the right information, then just tell agrē how often you want to submit and when you want to start. You can also follow the instructions below to manually create AgCollect export files if you'd like to see what information is submitted.
I want to read the white paper (with screen shots) on how to setup products and customers to be included in the AgCollect Export.
Notes
If you are using Customer Associations, combined sales results will be listed only under the "parent" account. Individual "child" account sales (which were rolled up to the parent account) will not be listed in the AgCollect export file.
Any customers flagged as Exclude from external reporting will not be included in the results.
Any products flagged as Exclude from AgCollect Export will not be included in the results.
To manually export AgCollect EMR information
* indicates a required field (other fields are optional)
Navigate to File > Exports > AgCollect EMR.
The AgCollect Export window opens.
In the Manufacturer* box, enter the manufacturer of the sales you are reporting (or all manufacturers).
In the Location* box, enter the location of the sales you are reporting (or all locations).
In the Start Date* box, optionally change the start date of the sales you are reporting.
All sales made on or after this date (up to the end date) are exported. One week before today’s date is selected by default.
In the End Date* box, optionally change the end date of the sales you are reporting.
All sales made on or before this date (up to the start date) are exported. Today’s date is the default.
Folder Name - Click Browse Folders* to select a destination folder.
Check Omit Work Orders if you do not want to include "sales-to-be".
Check Add product line comments to include invoice product line comments.
Click Export to create the file, or click Export and Email if you want to email the information immediately after exporting it.
If you clicked Export a message appears indicating the export was successful, and it asks you if you want to view the folder containing the exported file.
Click Yes to view the folder, or click No to close the window.
Caution
The .DAT file generated by agrē is in CSV (comma-separated value) format and can be viewed in an external program like Microsoft Excel (data columns are separated by a “pipe”| = Shift + \).
The keyword here is “viewed”. If any changes are made to the DAT file, including changing the file name, it may be rejected by the AgCollect import process or the sales data may be imported incorrectly.
Invoice Types [column B] include Charge (all invoices not flagged as prepaid are considered charged), Prepay, and Return.
Work Order Types include Prepay (committed and prepaid) and Early Booking (committed but not prepaid).
If you clicked Export and Email, a message appears indicating the export was successful, and it asks you if you want to view the folder containing the exported file.
Click Yes to view the folder, or click No to close the window.
The Send Email window opens.
In the From box, optionally change the email address you want the AgCollect EMR information to be sent from.
The email address you specified in your user configuration settings is entered by default but you can change it.
In the To box, enter the email address to which the AgCollect EMR information should be sent.
In the Subject box, optionally change the subject (i.e. the topic) of the message.
In the Add Note box, enter any additional information you want the recipients of the message to read.
Click Send.
Exporting Manufacturer Sales (FMC)
This export creates a data file that can be imported by FMC (RDS).
Before running the export for the first time you'll need to Manage Manufacturers and check the FMC box (one-time task) next to those who report to FMC.
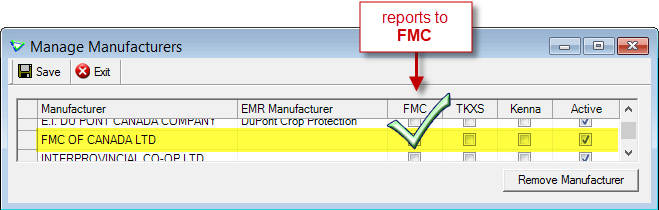
Inventory > Manage > Manufacturers
Each time you want to export an RDS data file you'll run Manufacturer Sales (FMC).
Submission of the data file to FMC Canada happens manually outside of agrē.
To export Manufacturer Sales (FMC)
Navigate to File > Exports > Data > Accounts Receivable > Manufacturer Sales (FMC).
Specify the Start Date and End Date.
The start date defaults to one month ago; the end date defaults to today.
Select a Location.
All Locations is the default, but you can select just one.
Follow the instructions below to export the sales data to a file.
Please do not change the default file name as the FMC servers are expecting a file with a specific naming convention.
Exporting Chemical Sales Summary data for Alberta Environment & Parks
This export enables pesticide vendors in Alberta to generate pesticide sales reports that meet the provincial regulatory requirements for reporting on pesticide sales when requested.
I want to read the white paper (with screen shots) on how to run the Chemical Sales Summary Export.
To export a Chemical Sales Summary
Navigate to File > Exports > Data > Accounts Receivable > Chemical Sales Summary (AB Environment).
Specify the Start Date and End Date.
The start date defaults to one month ago; the end date defaults to today.
Select a Location.
Locations are listed alphabetically and the first one is selected by default.
Note
Alberta Environment & Parks requires one export file per location which is why there is no <Company> option in the Location drop down list.
Choose a Product Type and/or a product Characteristic.
The government is interested in your sales of pesticide products and any product containing pesticides (like treated seed).
All product types and characteristics are selected by default.
Tip
Assign a distinct characteristic to only the products the government wants reported. This will allow you to include sales from several product types (for example Chemicals and Seed) in one export by selecting a single characteristic.
Follow the instructions below to export the sales data to a file.
Please do not change the default file name as your company name, location, and date range must be included.
Other Data Exports
While you can export the raw data of any report, using Data Exports will result in a more 'user friendly' data file. Data Exports can be particularly useful during set up and rekey.
Tip
You don't have to actually export the data - sometimes looking at the Preview tells you all you need to know.
You can also Copy and Paste the data into another program (like Excel) instead of exporting it.
To export other data
Navigate to File > Exports > Data
Select the data you want to export (or preview) from the list
Specify any Criteria for the export (not all exports require them)
Sometimes you may find what you're looking for just by previewing the export data.
Click Preview Data
You'll see the data presented in a format similar to a spreadsheet, with columns and rows.
Use the horizontal and vertical scroll bars on the right side and bottom of the window to view other cells, or click a cell with your mouse and use the arrow keys on your keyboard to move around.
If you want to 'group' the data you are previewing, for example by 'Location', click on the Advanced tab.
Position your mouse on a column header (it will turn blue), then click and drag it to the grey area above the column headers.
You can drag additional columns to create subgroups.
You can change the width of the columns by dragging the right column border, and you can change the order of the columns by clicking the column header and dragging it to the left or right.
Tip
You won't be able to change the width of the last column on the right. First change the column order by dragging the last column heading over to the left, then resize it.
When you're done previewing the data, click Exit. You'll be returned to the Export window.
Instead of exporting the data, you can copy it and paste it directly into another program, for example to a Microsoft Excel spreadsheet.
While previewing the data on the Simple tab, click Select All (the button is located in the bottom left corner of the window) to copy all cells, or click and drag your mouse to select certain cells.
Press CTRL+C (both keys at the same time) to copy the data you've selected.
Open a blank document in your destination program (like Excel or Word).
Press CTRL+V (both keys at the same time) to paste the data you copied.
To Export the data as a Text file
The data will be exported in a CSV (comma separated values) format which is readable by Microsoft Excel and by most text editing and spreadsheet programs.
Click Export to File
Select a destination folder from the list in the left pane, and optionally change the default export file name.
Click Save.
You'll see a popup message letting you know the export file was created successfully and a reminder of the location and file name. Click OK to acknowledge it.
The export file is ready to open in Excel, or any in other program that can read a text file (e.g. Windows Notepad, Microsoft Word, Corel Word Perfect, etc.).
The data will be exported in an XLS (Excel spreadsheet) format which is readable by Microsoft Excel, and may be readable by other spreadsheet programs.
Click Export to Excel
Select a destination folder from the list in the left pane, and optionally change the default file name.
Click Save.
You'll see a popup message letting you know the export file was created successfully.
The message will include the path and file name of the export.
If you have the Excel Viewer installed on your computer, you'll be prompted to open the file in the Excel Viewer.
Click Yes to preview the file in the Excel Viewer (or click No if you don't want to view it).
From the Excel Viewer you can click the Microsoft Office button and choose Open for Editing or Print.
The export file is ready to open in Excel, or any in other program that can read a XLS file.
Exporting Raw Data from Reports
For any report that you can preview, you can export the underlying data. The data will not export as cleanly as using a data export, but you can format or delete data as needed in the program you use to view the export (such as Microsoft Excel). When you export, make sure you save the data on your own computer, and not on the server.
Opening Text-Formatted Data Export Files in Microsoft Excel
I want to see an example (with screen shots) of exporting addresses to make customer mailing labels.
To Import a Raw Data Export File
Start Excel.
Navigate to File > Open and then select the folder where you saved the export file.
From the drop down list next to File Name, select All Files (*.*) to display a list of all files in the folder.
The file list usually defaults to only all Excel files. The export file is not in an Excel format (it's in a text file format) so you won't see it listed by default.
Select the export file name and click Open.
The Text Import Wizard begins at Step 1 of 3.
Select Delimited and click Finish.
You can skip Excel's import Steps 2 & 3 as the default options are fine.
Format the spreadsheet to better display the data.
e.g. widen columns to see entire contents, delete any columns you won't use, format dates to the way your company is used to seeing them, etc.
Hosted Users: Selecting a Destination for Exported Files
If you are a hosted customer, when you Save As you'll also see computers and drives for the agrē server. You won't be able to access any data files saved on the agrē server from outside of agrē, so you'll want to select one of your own computer's local hard drives, or one of your company's local network drives.
You can specify your own default destination, accept the company default destination, or temporarily change the destination on the fly.
Scroll down the drives list (in the left hand pane of the window). The destination drive you select should have the words 'Local Disk on YourDevice'sName' or 'Network Drive on YourDevice'sName' in the name. For example, your local hard drive appears as 'Local Disk (C: on MyComputerName)'. You may see a drive labelled simply as 'Windows C:'; that is the C: drive of the server which cannot be accessed outside of agrē. Always select a local drive.
It's a good practice for all users (and required if you're using Microsoft Windows Vista or later) to create a folder on the local drive where you store your agrē exports, instead of storing them at the main level (also called root level) of the drive.
After you select your destination drive and folder and click OK, you may see a different drive letter in the Export Complete window. For example, if you choose to save an export on your local 'Local Disk (C:)' drive in a folder called 'agreExports' you may see that it gets translated to '\\client\C$\agreExports\'. That's okay. Just keep going (that last "\" is important too- don't delete it).
Note
Please contact your CSC if you have any questions or would like them to help you step through selecting a destination drive and creating a folder for your exports.
Go back to the top of the page