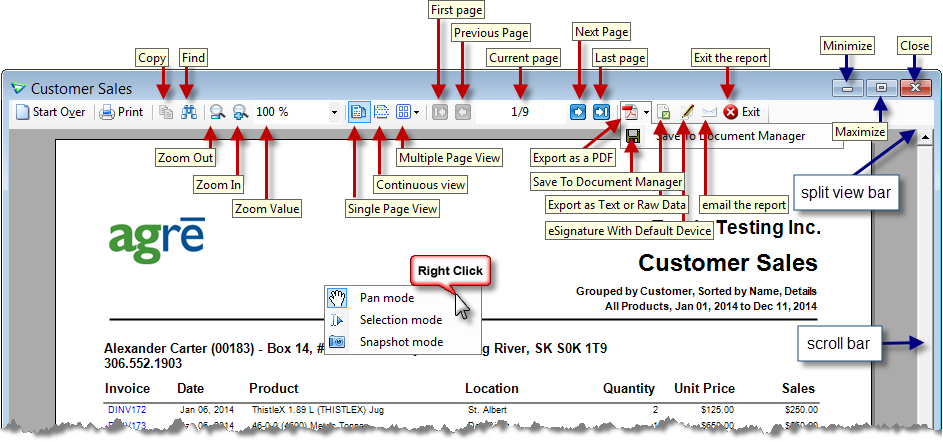
agrē uses common controls for most reports. Hold your mouse over a button and a tool tip will pop up with the name of the control.
What you'll find:
Window View Controls
The standard Microsoft Windows view controls are located in the top right corner of the agrē window.
Standard MS Windows view controls
The scroll bar represents the overall length or width of a or a report window.
The position of the scroll bar's scroll box changes as you move to different pages of the report. The size of the scroll box adjusts depending on the length of the report so that it indicates what portion of the report is currently visible in the window. If most of the report is visible, the scroll box occupies most of the scroll bar shaft. Similarly, if only a small portion of the report is visible, the scroll box occupies a small part of the scroll bar shaft.
You can scroll through the content of the report by:
clicking one of the arrow buttons (up or down)
clicking an area in the shaded scroll bar shaft
clicking and dragging the scroll box
The amount of scrolling that occurs when you drag the scroll box depends on the distance dragged and the length of the report.
Minimize 'hides' the report behind a small title bar in the bottom left corner of the agrē window.
Click the title bar to bring it back to regular size.
If you can't see the title bar, navigate to Window. You will see a list of all your open agrē windows. Select the window you want to bring to the front.
Maximize expands the report to fill the agrē window
Split View allows you to see sections of the same report at the same time.
Click and drag the split view bar down to split the view in two horizontally. Click start over and run the report again to clear the split view.
Note
This feature is a favourite of Tronia employees. It's very handy for viewing the column headers in the top window and the data or totals in the bottom window.
agrē Toolbar Buttons
You'll see the same toolbar button on every report.
agrē toolbar buttons
Start Over returns you to the search window with the criteria from your last search.
Print brings up the standard Microsoft Windows print control window.
Select which printer, which pages, and how many copies to print.
Copy copies the data to the clipboard so that it can be pasted into another application (like a word processor).
keyboard shortcut is CTRL+C
only data on the current page is copied
when pasted, the data will not be formatted exactly as it appears in the report
if you want an exact representation of the entire report in an electronic format, export the file as a PDF instead
if you want to manipulate the data in your destination document (e.g. add up dollar values in a spreadsheet) you'll need to export the raw data
works best with simple reports (e.g. customer list)
Find allows you to search for specific text in the report, eg. a particular invoice number or last name or dollar amount
keyboard shortcut is CTRL+F
Zoom Out/In are used to decrease or increase the size of the text.
Click as many times as you need to get the font size you want.
Zoom Value allows you to specify a specific zoom (e.g. 80 or 125 - no need to type the %) instead of clicking Zoom In or Out multiple times.
Single Page View displays one page of the report at a time.
It's mainly used when you're viewing multiple pages and want to back to viewing one page.
Continuous Scroll allows you to use the scroll bar to move through the entire report instead of within a single page.
Note
Another favourite feature of Tronia employees. We use it all the time!
Multiple Page View allows you to choose how many pages you'd like to see at one time.
Tip
Maximize the agrē window before you view multiple pages so the text is large enough to read.
First/Last Page takes you to the first/last page of the report.
Previous/Next Page takes you to adjacent pages of the report.
Current Page allows you to specify a specific page number (e.g 10) instead of clicking Next or Previous Page multiple times.
Export as a PDF exports a copy of the report (outside of agrē) as an Adobe Acrobat Portable Document File.
Caution
If you are a hosted retailer (you run agrē over the Internet and use Citrix to access it), please read the section on selecting a destination for your PDF file before you export.
Tip
Emailing a report to yourself automatically creates a PDF of the report and attaches it to the email. You may prefer to save the email attachment to your local hard drive instead of exporting as a PDF.
Save to Document Manager creates an eDocument (in PDF format) of the report and stores it in the Document Manager (inside of agrē).
eDocuments can be viewed and managed from the Document Manager
I want to read the CRM-Customer Relationship Management white paper (which contains more detailed info about the Document Manager).
and on the Documents and Account History tabs of the Customer Account.
and the most recent one can be viewed from the respective home form by clicking the down arrow next to Preview Item.
Export as Text or Raw Data if you want to manipulate the data in your destination document (e.g. add up dollar values in a spreadsheet).
For any report that you can preview, you can export the underlying data. The data may not export as cleanly as using a data export, but you can format or delete data as needed in the program you use to view the export (such as Microsoft Excel).
Run any agrē report. (e.g. Accounts Receivable > Reports > Customer Prepayment Position).
Click Export as Text or Raw Data.
Select an export Type.
Excel creates an export file already in XLS format (although data from sub-reports are not included), so all you'll need to do is open it directly in Microsoft Excel - no importing or data conversion required.
Raw Data is used often (and does include sub-report data), but you may only need the Report Output. XML is rarely used.
The default TAB Separator works well for most exports, but you can change it to another character.
Programs like Excel use the separator when importing files to know what data belongs together in the same column.
If exporting Raw Data, leave the Text Indicator as " (double quotes) and the leave the check mark in Include Headers.
Click Export.
Select a destination folder from the list in the left pane, and optionally change the default export file name.
The data will be exported in an Tab Separated Value text format which is readable by Microsoft Excel, and by most other word processing and spreadsheet programs.
Caution
If you are a hosted retailer (you run agrē over the Internet and use Citrix), please read the section on selecting a destination for your data file before you export.
Click Save.
You'll see a popup message letting you know the export file was created successfully. Click OK to acknowledge it.
The export file is ready to open in Excel, or any in program that can read a text file (e.g. Windows Notepad, Microsoft Word).
Tip
If you selected Type = Report Output and you didn't get all the data fields you wanted, export again with Type = Raw Data.
-
To export the report as raw data
eSignature with Default Device allows you to digitally sign an electronic copy of a report and stores it in the Documents Manager (inside of agrē).
I want to read the eSignature white paper (with lots of screenshots).
Device Selection allows you to capture an eSignature from a device different from your default.
Email the Report opens the Send Email window so that you can email the report as a PDF attachment.
Note
You also batch email statements and invoices rather than sending them one at a time, and you can configure some reports to autoEmail on save.
You can change the format of the default file name of the PDF document attachment (at the company or user level).
The agrē emailer is very basic; it just sends emails. It does not track sent emails, nor provide any messages if the email could not be delivered.
Tips
Best Practice: Email the report to yourself, then forward it to the intended recipient using your company's full-featured email application. This gives you a copy in your sent folder and you will receive a message if the email could not be delivered.
- or -
(Config U) Email the report to the intended recipient and always CC or BCC your Email so you receive a copy as well.
- or -
Configure agrē to use your company's email server (at either the company or user level) which may provide you with better audit tracking.
Your company may restrict editing of some fields.
click the Email the Report button (the envelope icon)
The Send Email window opens.
in the To, Cc, and Bcc fields, type in the email address of the recipient in the applicable fields
the To, Cc, and Bcc fields are buttons that can be clicked to bring up a list of the email addresses listed on the customer account or the email addresses of any customer contacts (for customer reports), and/or the names and email addresses from your Company and User Address Books (click an Address Book to edit it)

agrē provides a generic Subject, but it can be edited
Attached Report is the filename of the attached report; the file name can be edited before sending.
The default filename format can be changed in the config options (at the company or user level).
optionally add Additional Attachments to send along with the report
(allowed file types are: Microsoft Office DOCx, XLSx, PPTx, MSG; Adobe Acrobat PDF, TXT, ZIP, DWF [shape files], HTML, PNG, GIF, JPG, TIF)
click Add
the Choose your attachments window opens
navigate to the folder where the document is saved, select it, and click Open
multiple files can be attached (up to a maximum total of 5 MB)
to detach a file, select it and click Remove
there's a large text box for typing in extra details about the report you're emailing
(you can change the default body text in the config options at the company or user level)
the From field will be populated with:
your email address if you specified one in your User Config Options
or
the company email address specified on the Report Options tab of the Company Config Options
optionally enter CC or BCC addresses if you want the sender to receive a copy of the email
click Send when you've filled in all the information
on some 'single customer' reports you'll be prompted (if you have permission) to save this email address on the customer's account (this is the address that will be used for batch emailing of statements and invoices, and for all autoEmailed reports for the customer).
I want to watch the video: Using Selection Modes (33 seconds)
Pan Mode is the default; clicking the report and holding the mouse button allows you to drag the page up and down within the report window (same as using the scroll bar).
Selection Mode allows you to click and drag to select text. Release the mouse button and press CTRL+C (or click the Copy button) to copy the text the clipboard so you can paste it in another application.
Snapshot Mode allows you to click select an area of the report. When you release the mouse button, the area you selected is automatically copied to the clipboard and ready to be pasted into another application.
Keyboard Shortcuts for Viewing Reports
CTRL+C = Copy
CTRL+F = Find
PageUp takes you to the next page
PageDown takes you to the previous page
End or CTRL+End takes you to the last page of the report (will not work in Continuous Scroll mode)
Home or CTRL+Home takes you to the first page of the report (will not work in Continuous Scroll mode)