Blends are combinations of raw, blendable products that follow the rules as defined by the blend type. Blends usually belong to a customer, but there is also a "calculator only" mode for quick blends that won't be saved for later use.
What you'll find:
Basic Blend - NPKS
Start by clicking the Make a Blend button.

On the Blend Setup tab, choose a customer (or calculator only), specify the location where the blend is being made (i.e. whose inventory levels are going down?), the calculation method (for this example, select #1 Nutrient Requirements), and which blend type rules to follow.

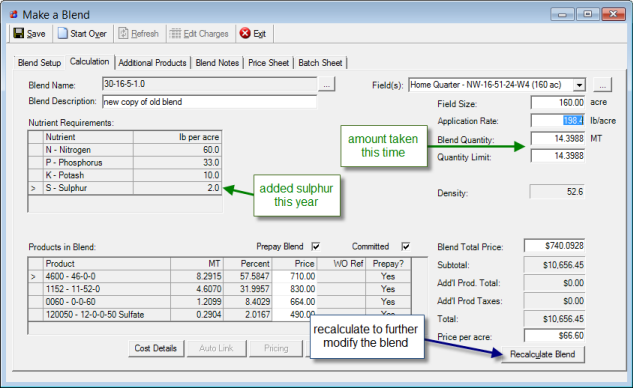
On the Calculation tab, enter the blend information: the nutrients and pounds per acre, and the raw products to use in the blend.

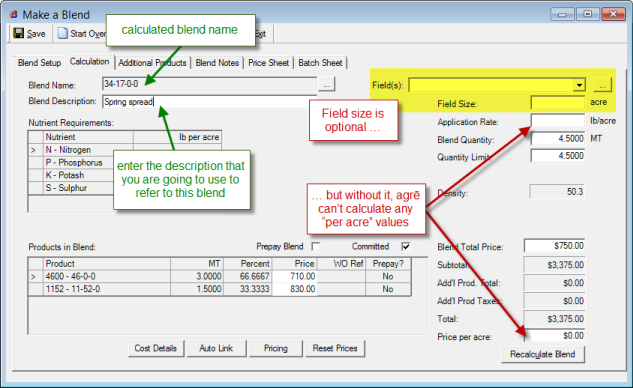
After calculating the blend, you have more choices: you can enter a blend description (optional), you can specify a application rate or a quantity/amount to make, and you can change pricing of the blend or the raw products.

If the results are not what you wanted, click Recalculate Blend, change the requirements and/or products as needed, and calculate the blend again.

When you are ready to print the Batch Sheet, decide what information fields you want to display (the defaults are set in the blend type if you want to change them permanently). You can run and print the batch sheet now (if you're not going to save the blend), or you can wait to print it when you save it to a loadout ticket or invoice.

You have several choices when saving the blend:

Depending on what Save option you select, the work order, loadout ticket, or invoice appears with the blend information already entered on it so you can quickly click Save that too. (You can, however, edit the data first if needed.)
Choose to save the blend on a Loadout Ticket for now and then you will adjust the actuals later.

After you save the loadout ticket, you can choose to preview and print the loadout ticket, the batch sheet, or both.

Tip
Want to try speed blending without using your mouse? You'll use mainly the keyboard, config option defaults, and shortcuts to make a blend in record time!
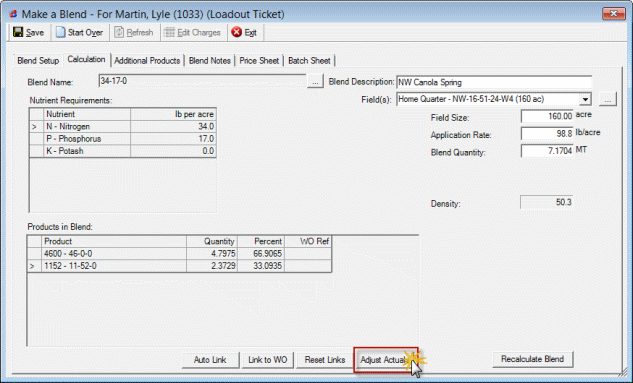
Adjusting Actuals
Given the limits of even modern blender hardware technology, it's almost impossible to use the exact same amounts of raw products indicated on the batch sheet. You may want to record the amounts that were actually taken to keep your inventory levels in agrē accurate.
Edit the loadout ticket and click on the Products tab. Select the blend product row and click Edit Row.

Click Adjust Actuals.
Enter the quantity of product that was actually used to make the blend and click Update to save your changes.

Click Save to save the changes to the blend, then click Save again to save the loadout ticket.
Basic Blend - Product Quantities
Start by clicking Make a Blend.
On the Blend Setup tab, choose a customer (or calculator only), specify the location where the blend is being made (i.e. whose inventory levels are going down?), the calculation method (for this example, select #4 Blend Product Quantities), and which blend type rules to follow.

On the Calculation tab, enter the blend products and how much of each was used. Calculate the blend.

After calculating the blend, you have more choices: you can enter a blend description, a field size or a application rate (all optional), and you can change pricing of the blend or the raw products.
If the results are not what you wanted, click Recalculate Blend, change the quantities and/or products as needed, and calculate the blend again.
Additional Products Added to the Blend
The grower wants enough 34-17-0-0 to cover 100 acres and would like you to mix some canola seed in with the blend. Each bag of seed will cover 10 acres.
If you want to mix in other products with the blend (like seed or chemicals) you do that from the Additional Products tab after you calculate the blend and specify either a quantity or the number of acres.

Click Add Product Row.

Specify the product and the ratio. Since 1 bag covers 10 acres, you'll need 0.1 bags/acre. agrē already knows the blend is for 160 acres (that's the number of acres you entered on the Calculation tab) so it calculates that you'll need 16 bags for 160 acres.

The math doesn't always work out this nicely. What if the ratio was 0.08 bags per acre? You'd need to add 12.8 bags to the blend, but your company policy is to sell only whole bags.

You can manually change the quantity to the nearest whole bag.

Split Source Blends
The customer wants to split the nitrogen requirement equally between a slow release source and a quick release source.
Note
The only two calculation methods that can accommodate Split Sources are #1 NPK and #2 Guaranteed Analysis
On the Calculation tab, type in the nutrient requirements of the blend. Check the Split Sources box. Choose the nutrient you want to split, specify which product to split with, and what percentage of the nutrient requirement should come from the split source product.

Calculate the blend.

Copy a blend from Blend History
The grower comes in and tells you he want to take 10 MT of one of the blends that he took last year.
To find out what blends the customer took last year, call up their account and click Blend History.
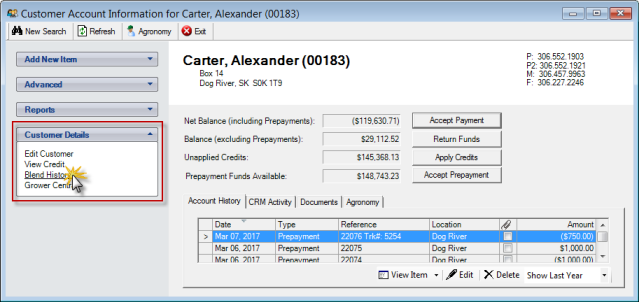
The Blend Description or Field Name and the details will assist you in selecting which blend you want to copy. Click Copy Selected Blend.


If default prices or location have changed since the customer took the original blend, agrē will ask if you want to use the new prices or the old prices.

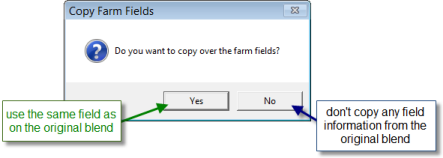
If one or more farm fields were associated with the original blend, agrē will ask if you want to copy the same field(s) to the new blend.
You can make an exact copy of the blend, or you can use it as a starting point and modify it to make a new blend (e.g. he wants the same blend as last year, but with 2 lbs/acre of sulphur added for this year).
Note
When you save, you are saving a new copy of the blend - the original blend (including nutrients, products, prices, quantity, and application rate) stays the same.
Blend Notes
If you want to add notes about the blend that will print on reports, use the text boxes on the Blend Notes tab.

Blend Reports
Batch Sheets
The batch sheet is the piece of paper they'll use in the blend shed to make the blend.
The default values are defined in the blend type, but you can change a lot of the settings if you need to print something differently for this particular blend.

The Batch Sheet will display the items you've chosen.

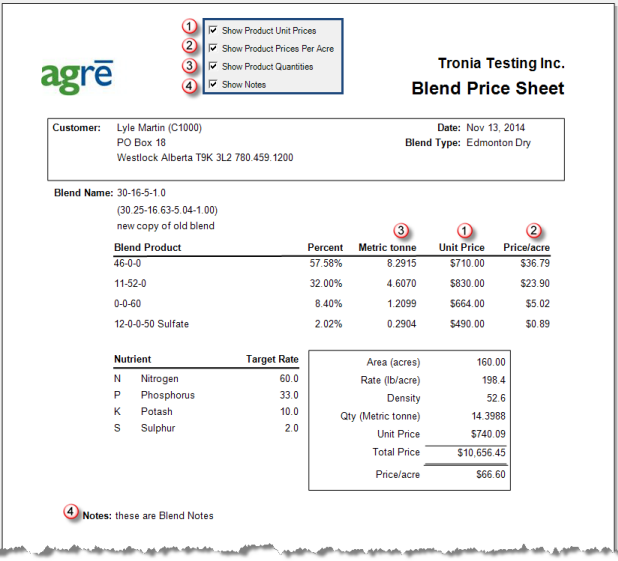
Price Sheets
You may want to print a blend price sheet for the customer or for your own records.
You can display more than just blend prices on the price sheet.
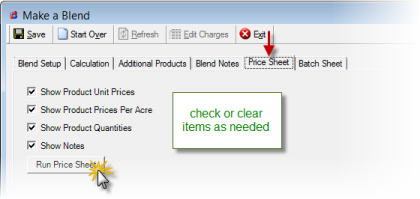
The Price Sheet will display the items you've chosen.
Linking Blends to Work Orders
Depending on your company's AR Business Process, linking can be done from an Invoice (where you'll see the pricing information) or from a Loadout Ticket (which does not display pricing).
Auto Linking Blends to Straight Products on a Work Order
Putting straight blend products (raw ingredients) on a work order gives you the flexibility to make any blend the customer wants, add any extra nutrients and products, and still link the blend back to the work order.
Make a blend and Calculate it. Type in a quantity or field size. Click Auto Link.

All products available on active work orders have been linked, the prices and the prepaid flag will match the work order, and the quantity remaining on the work order will be reduced by the amount taken.

Tip
When you setup work orders with straight products instead of blends, you can link any blend back to the work order. You're not limited to blends made with just the products on the work order.
Manually Linking Blends to a Blend on a Work Order
Auto Link doesn't work with blends on a work order (BOAWO), so you'll need to do a little extra work and link manually.
Caution
In order to link a blend back to a Blend
on a Work Order (BOAWO), the blend you want to link must be
a copy of the blend on the
work order. This means you must copy
the blend from history and save it on a loadout ticket
or invoice or you won't be able to link back to it.
You could also start with a loadout
ticket or invoice
and import the blend from the work order - this will automatically
link the blend back to the work order.
Copy the blend from the Work Order in the customer's Blend History, and save it on a loadout ticket or invoice.

agrē will ask if you want to use the current prices. Since you'll be linking back to the work order and getting prices from there, you can click either Yes or No; in this situation, it won't matter.

Make any necessary edits to either the quantity or field size, and Save the blend.

You'll see in the WO Reference column that a work order is available for linking. Click Link to Work Order.

Select the Work Order and click Use Selection.

The blend has been linked back to the Blend on a Work Order, the prices and the prepaid flag will match the work order, and the quantity remaining on the work order will be reduced by the amount taken.
