FCL Best Practices
What you'll find:
ServiceNow Idea Portal (SNIP)
Let Your Voice Be Heard: Vote for New Enhancements
Idea Portal for Enhancements to Tronia’s Systems (hub.crs) Original Launch date October 27, 2022
This link takes you to the FCL/CRS Hub Portal where you have a say in improving the software you use everyday. You can add your own ideas, and express support for existing ideas with your vote. The more votes, the more you convey the message that the enhancement eliminates a pain point, or is a great improvement and deserves a closer look. Subscribe to an idea, and you will be informed of any changes to it. Your comments are welcome too!
The process is intuitive, but here are some hints to get you started.
I want to read FCL's documentation (with lots of screenshots) about SNIP - ServiceNow Idea Portal.
ServiceNow Idea Portal: Ideas - Idea portal (service-now.com)
Accounts Receivable
Discounts
Instant Discounts
General Knows:
The Instant Discount item numbers will be setup in the same hierarchy as their corresponding products.
The Setup
Import the Discount Item(s)
Find the FCL item number for the Instant Discount by:
Referring to the program information provided by FCL or
Searching the eCommerce Catalogue by searching Instant Discount or
Contacting the Crop Inputs team (RSC or Replenishers) to request the item #
Once you’ve confirmed the FCL item number of the Instant Discount:
Navigate to Inventory > Manage > Products.
Search for the item to be discounted. If it’s not found you'll need to import it from CRS Hub.
Note
Normal external reporting requirements apply. Ensure the Instant Discount Item Numbers are included in AgCollect and Kenna reports as appropriate.
For each Instant Discount item:
Navigate to Inventory > Manage > Products.
Search for the Instant Discount item number.
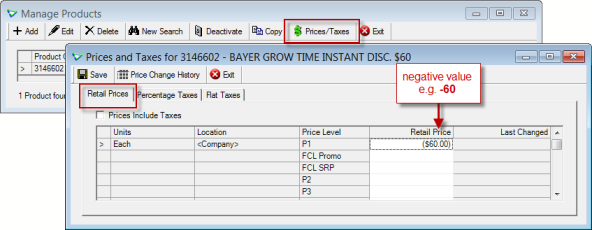
Review the Pricing
Edit the product to change Prices.
For these item numbers, the mainframe does not have an SRP, therefore SRP will be absent and needs to be entered. You will override the price to be the value of the instant discount.
Be sure to enter the price as a negative amount as it is a credit rather than a debit (charge).
Inventory > Manage > Products
Correspond the Discount Item to the selling Item
Creating a relationship between the applicable products and the instant discount items can be done two ways. Each has their own risks and rewards.
Retails are encouraged to determine which method is preferable for their team.
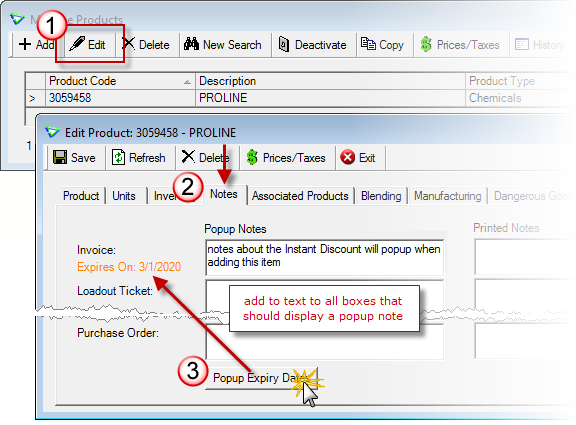
1. by adding Product Notes ending on a fixed date
Within the Notes tab while editing a product, adding notes is a customizable and safe way to notify users (internal) and/or members (external) of the instant discount offer and the applicable item (if the order qualifies) whenever the applicable products are added to an invoice, load out ticket, work order, location transfer, inventory receipt, manufacturing, and/or purchase orders.
Pros By utilizing the Popup Expiry Dates, no follow-up to remove the notes regarding the offer is required as the notes will stop displaying on the specified date. It is recommended to be the end date of the offer.
Cons Notes are limiting as it requires the user to search the instant discount item following the reminder and add it to the transaction manually.
Inventory > Manage > Products
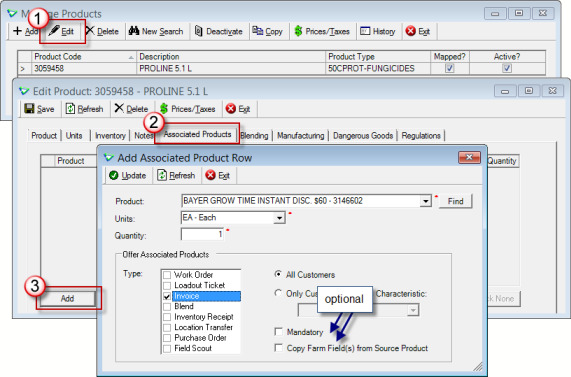
2. by Associating Products
Instead of manually searching the instant discount item to add it to the document, by associating products and checking the optional box, you'll be prompted to add the associated product to the transaction.
Pros Associated Products work best with items like Deposits, but can also work for Instant Discounts when the users are knowledgeable on the offers involved with the discounts.
Cons Although associating products is convenient, it increases the risk of user error where the instant discount may be applied to a quote or work order that does not qualify for the discount offer. This includes possibly forgetting to remove the Associated Product from the discounted item (the Popup Expiry Date controls just display of the popup, not the length of the discount period) and applying the discount after the offer ends.
Edit the item to be discounted.
Add the Discount Item to the Associated Products tab.
Inventory > Manage > Products
Caution
If you feel the risk of using Associated Products is too high and will result in Instant Discounts being offered on purchases that do not qualify, you are encouraged to use Notes with Popup Expiry Dates as mentioned above.
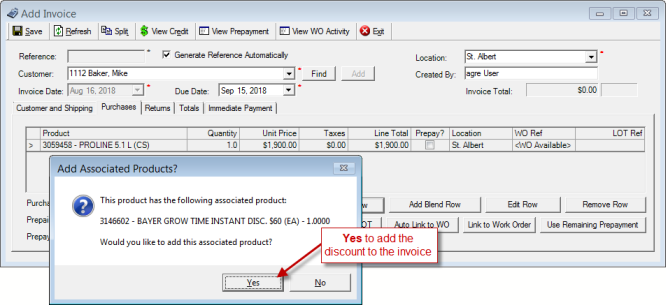
Associated Product Example: Regular Invoices (not Prepaid)
For a regular sale, record the item and the discount.
create a new Invoice
on the Purchases Tab - add the item to be discounted (e.g. Proline)
if prompted, add the Discount Item (you won't be prompted if the discount item is mandatory)
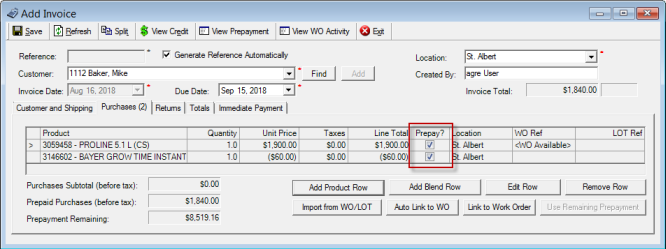
Associated Product Example: Prepaid Invoices
When the member is using prepay dollars not only do they need to get the discount, it needs to be added back to their prepayment balance.
as long as the item to be discounted (e.g. the Proline) is prepaid, when the associated Discount Item is added it will also be prepaid
Direct to Farm Process
In order to avoid any issues with inventory balances and costing (as agrē uses the First In, First Out method of assigning costs) it's important to create the Inventory Receipt, Loadout Ticket & Invoice at the same time (at least the same day). This applies to both Option 1 and Option 2.
OPTION 1: Combined Direct-to-Farm (D2F) Margins
Use this method if you're not concerned about separating Direct-to-Farm margins from regular sales margins.
Option 1 uses the retail location that is processing the Direct-to-Farm.
1. Create Work Order
2. Create Purchase Order
3. Create Inventory Receipt - receive the inventory first! (FIFO)
4. Create Loadout Ticket
5. Create an Invoice for the Customer and accept payment
6. Create a Purchase Invoice once received from supplier
Run the Customer Sales report for the retail location(s) and check Show Margins.
OPTION 2: Separate D2F Margins
Use this method if you would like to keep Direct-to-Farm margins separate from regular sales margins.
Option 2 involves associating a virtual warehouse used only for Direct-to-Farm activity to a retail location. Each retail location involved in Direct-to-Farm requires its own virtual warehouse.
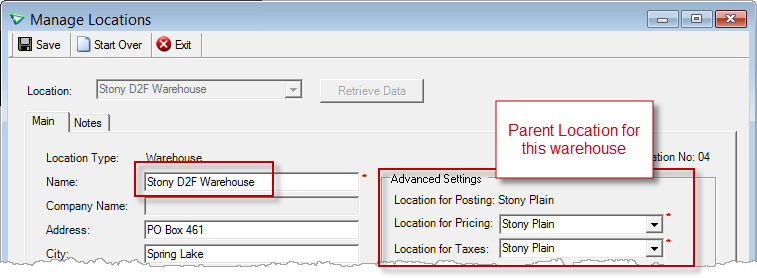
File > Manage > Locations
The workflow is the same as above, but all inventory movement flows through a Virtual Direct-to-Farm Warehouse instead of a retail location.
1. Create Work Order
2. Create Purchase Order
3. Create Inventory Receipt - receive in the inventory first! (FIFO)
Items are received at the Virtual Direct-to-Farm Warehouse.
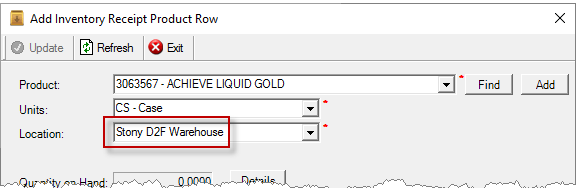
Inventory > Inventory Receipt > Add > Add Product Row
4. Create Loadout Ticket
All Direct-to-Farm items are loaded out from the virtual warehouse.
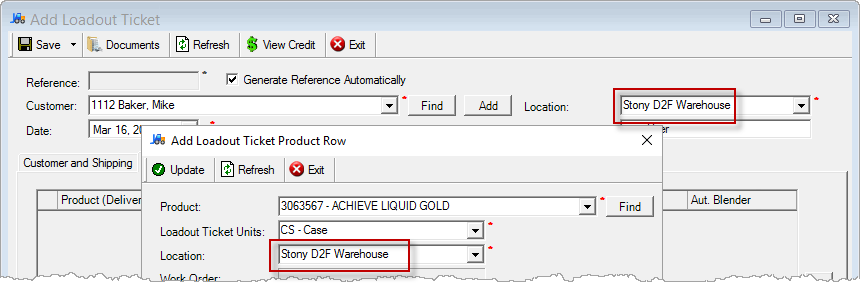
Accounts Receivable> Loadout Ticket > Add > Add Product Row
5. Create an Invoice for the Customer and accept payment
All Direct-to-Farm invoices are billed from the warehouse's parent location - warehouses can't "own" invoices, they can only hold inventory - and that is where the sale will be recorded (remember in agrē it's not a sale until it's on an invoice).

Accounts Receivable> Invoice > Add
You may be required to provide your controller with a true representation of Direct-to-Farm Margins vs regular Customer Sales Margins.
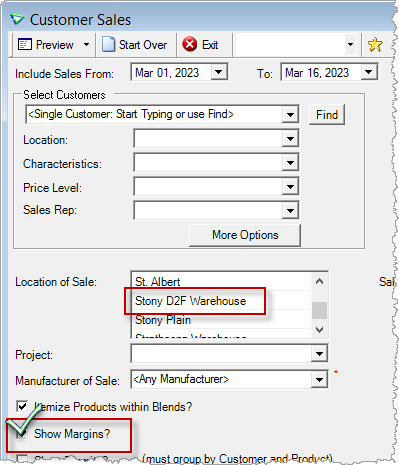
Run the Customer Sales report where the Location of Sale is the virtual Direct-to-Farm warehouse(s) and check Show Margins.
6. Create a Purchase Invoice once received from supplier
How do I process a payment for equipment I am leasing to a Grower?
You want the invoice in the grower's name (for patronage), but you need to make sure the Leasing Agent is also referenced. The easy-to-follow process is outlined in the FCL Leasing Agent Process white paper.
I want to read the FCL Leasing Agent Process white paper (with lots of screenshots).
How do I create a POS (point of sale) Invoice?
The CRS Cashier Training Guide goes through several examples of how to create POS Invoices for sales and returns.
I want to read the CRS Cashier Training Guide for POS Invoices white paper (with lots of screenshots).
How do I Deactivate a Member?
It is recommended that you review your members' status within agrē and keep it in sync with the data from the FCL mainframe at least once a year.
A member can be deactivated as long as they have:
no unbilled Loadout Tickets
Accounts Receivable > Loadout Tickets > New Search > This Customer > Status = Not yet billed
no open Work Orders
Accounts Receivable > Work Orders > New Search > This Customer > Status = Active
First, check for FCL Deactivations using data export: Customer List.
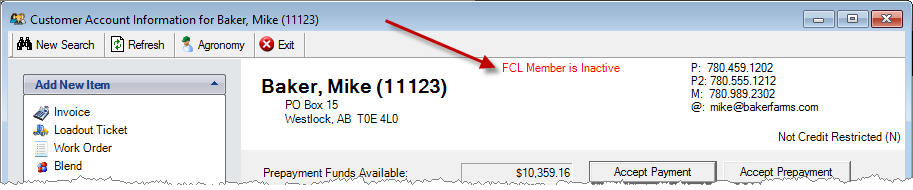
Refer to the FCL Status column for members who are Inactive.
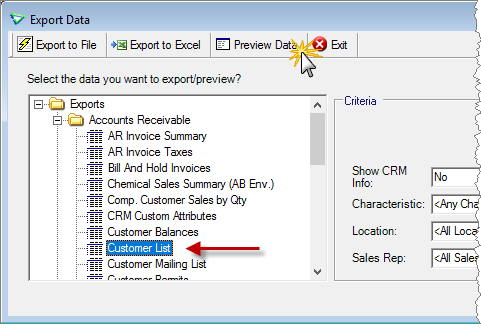
File > Exports > Data
Tips
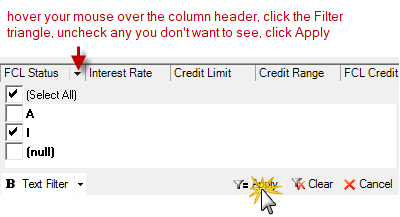
Click the column header to sort in descending order (the sorting triangle shows whether it's sorted ascending or descending) to list the inactive ones at the top. Or hover over the column header with your mouse and click Filtering to show just the Inactive ones.
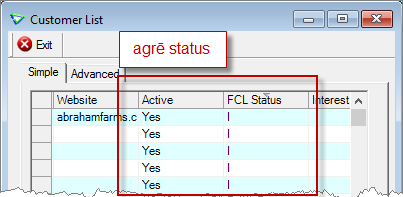
Refer to the Active and FCL Status column - I for FCL Inactive
This will give you the list of all Inactive FCL members that need to be deactivated also in agrē.
Some retails may also wish to run this the opposite way as well - find the members that are Inactive in agrē but Active in FCL, then activate them in agrē (agrē has no restrictions for reactivating mapped members).
You can double check the member's agrē status is active (and FCL Status is Inactive).

Accounts Receivable > Manage > Customers > Edit or
Accounts Receivable > Customer Accounts
Deactivate the member.
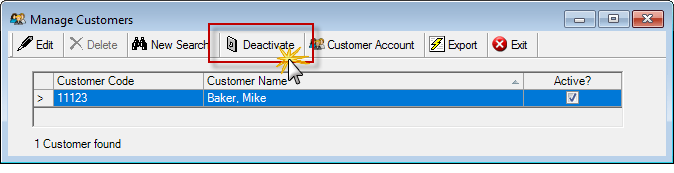
Accounts Receivable > Manage > Customers
Inventory
How do I enter my Item Forecasts?
FCL has written a document to guide you through the steps of exporting and completing a Forecasting Worksheet, then importing those forecast values into agrē.