What you'll find:
Overview: Inventory Receipts
Inventory Receipts are used to record the receipt (or return) of inventory from a supplier. Products can be added to the inventory receipt directly or be pulled in from existing purchase orders. All inventory products that you receive from your suppliers require inventory receipts.
Click the Documents button to attach a document to the inventory receipt.
When an inventory receipt is saved, the inventory level is updated but there is no change to the supplier balance. The Accounts Payable balance will not be affected until a purchase invoice for the inventory receipt is added and saved.
Tip
You can add inventory receipts on the fly from the Purchase Invoices window if the inventory and the Purchase Invoice arrive at the same time.
I want to read the Adding Inventory Receipts cheat sheet (with screenshots).
I want to read the white paper (with screenshots) about Lot Number Management (because I receive products with Lot#s).
Adding an Inventory Receipt
To add an inventory receipt
* indicates a required field
Navigate to Inventory > Inventory Receipts.
The Add Inventory Receipt window opens.
Click Add
You could also search for and select an existing inventory receipt and copy it - just click Copy instead of Add - but no links to purchase orders will be copied. You'll need to Link to PO manually.
Select the Supplier* of the product.
Click Find to search for a specific supplier or click Add to add a new supplier.
Type the Reference* number (must be unique for this supplier) from the supplier’s bill of lading, or check Generate Reference Automatically.
Each Inventory Receipt requires a unique reference number for future tracking. If the Generate Reference Automatically check box is selected, agrē assigns the next sequential inventory receipt reference number.
(optional) Change the Receipt Date* (today's date is used by default, but you can backdate if you have permission).
Enter any Comments about this inventory receipt (they will print on the inventory receipt report).
Shipping section
(config C) Select the Trucker that delivered the products.
Enter the Truck Unit #.
(free-form text field)
Enter the shipper's Bill of Lading reference number.
(you may want to use the same number as the Reference Number on the shipper's delivery slip or Purchase Invoice for cross-referencing)
Select a Fixed Asset to associate with this inventory receipt.
Only Purchased fixed assets are listed.
Select a Supplier Location.
This is the address of the supplier shipping location and will display on the inventory receipt report and on the TDG report.
Add the products that were received or import them from a Purchase Order
Click Save to save the inventory receipt
Inventory counts are updated immediately to reflect the change in product quantity at the specified location(s)
Adding Items to Inventory Receipts
To add an item to an inventory receipt
* indicates a required field
Click Add Product Row.
The Add Inventory Receipt Product Row window opens.
Select the Product* that was received
Click Find to search for a specific product or click Add to add a new product.
(optional) Change the default Units* if required
Tips
Click Details to view additional inventory details for the product (e.g. quantity on order).
The window opens and you can view the additional inventory details.
Columns can be resized.
Click Show Other Locations to view the same information for all locations.
An Inventory Receipt can include product that was received at more than one location from the same supplier.
After 2 or more products have been added, click any column header in the grid to sort the product rows.
Click again to sort the other way.
Type in the Quantity* (positive amount for a receipt; negative amount for a return to supplier)
If you are receiving scaled goods, click Scale.
The Scale Details window opens.
Enter the Gross Quantity, Tare weight, and Dockage, and agrē will calculate the Net Quantity and Clean Quantity received (both of which must be greater than 0).
Click Update.
The Scale Details window closes and the Clean Quantity is copied to Quantity.
Receiving - If you are receiving inventory, an Est. Unit Cost* is required.
The value can be positive or negative. This is only an estimated cost; it will be updated by the actual cost on the Purchase Invoice. agrē will default to the last cost for this product at this location but you can override it if you wish.
Return to Supplier - If you are returning inventory (Quantity is negative), agrē will check the cost history table from that location and use the cost of the next available unit.
If this field is not visible, it's because you don't have permission to see it. Don't worry; agrē knows what it is.
Tips
Click Cost to select a Target Cost. If you Select Target Cost, agrē will allocate as many units at the cost you selected as are available, starting with the oldest. Once those units are used, the units closest in cost to the target - higher or lower - are used, again starting with the oldest. It's like doing a return and a Cost Reallocation in one step.
Enter any Comments about this product (they will print on the inventory receipt report)
Select an existing Lot Number from the drop down list
- or -
click the ellipsis [...] and the Select the Lot Number(s) window opens.
select Add New Lot Number to add a new Lot# on the fly
(or Edit to coreect an existing one)
remember to check the Use box on the Select Lot Number(s) window to associate the newly-added Lot# with this inventory receipt as the connection is not automatic
the company config option to show only Lot#s with on-hand inventory is ignored here
since this is a brand new Lot#, there won't be any on hand until you save the inventory receipt
to select multiple Lot#s
check Use next to each Lot# received
edit the Qty of each Lot# to match quantity received
Select the Lot#(s)
Click Update to add the product to the inventory receipt
The Add Inventory Receipt Product Row window closes and the product appears in the list on the Add Inventory Receipt window.
In addition to the values you entered, the Billed On column is blank until the item is added to a purchase invoice and the purchase invoice is saved.
Note
If you have inventory receipt notes specified for the product, a message containing the notes appears. Click OK to continue.
(optional) Link the receipt of the product to an existing purchase order.
Click Add Product Row to add another product if required
Linking to Existing Purchase Orders on Inventory Receipts
When you link to existing purchase orders from inventory receipts, you are associating items on the inventory receipt to those same items on the purchase orders. You can link to individual release numbers for an item or the entire item without a release number. In order to link, the billing units for an item on an inventory receipt must match the units specified for the item on the purchase order.
The prices for the items on the inventory receipt are updated so that they match the prices quoted on the purchase order. If the purchase order does not have specified prices, the current prices are displayed on the inventory receipt.
Tip
If you want the cost on the Purchase Invoice to automatically match the cost on a Purchase Order, you need to link the Inventory Receipt before importing it to the PI. Linking at the PI level will not automatically match the PO cost.
When the inventory receipt is saved, information on the purchase order and inventory receipt is updated: the referenced purchase order is updated to reflect the quantity taken on the inventory receipt, and the location of the item on the inventory receipt is changed to match the location of the item on the purchase order.
If you imported items from a purchase order into the inventory receipt, the Link To PO button is unavailable for those items since they are already referencing a purchase order.
To link to an existing purchase order
From the Product list, select the item you want to link to a purchase order item and then click Link To PO.
The Purchase Order Link window opens.
If there are no active rows (items) on purchase orders for this item and supplier, the list is blank and the message “No Lines found” appears in the bottom left corner.
If your business practice is to link to active lines only, click Exit to go back to the Add Inventory Receipt window.
Note
Each row in the list is an item (or a release number for an item) on a purchase order. The reference number indicates which purchase order the item belongs to; therefore, if multiple items have the same reference number, they exist on the same purchase order. When you link to them, the purchase order reference number displays in the Item list.
Check Include Expired Purchase Orders if you've chosen to allow linking to expired purchase orders, and want to do so now.
Expired purchase orders are listed in red.
Select the Include completed purchase order lines check box if you want items with a completed status to appear in the list and be available to link to.
In the Purchase Order Item list, select the item or release number to link to the inventory receipt item and then click Use Selection.
The Purchase Order Link window closes and the PO Reference column is updated on the Add Inventory Receipt window.
Note
If the quantity you enter for the inventory receipt item is greater than the quantity available for the purchase order item, a message appears asking if you want to exceed the ordered quantity. When the quantity received is equal to or greater than (overfills) the quantity ordered, the status of the item is changed to Complete.
If release numbers are used, the status of the release number is changed to Filled. Click Yes to exceed the ordered quantity, or click No to cancel.
Importing Items into Inventory Receipts
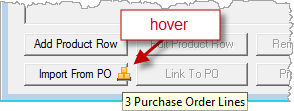
Items can be pulled into inventory receipts from existing purchase orders. When adding an Inventory Receipt a visual indicator  blinky displays next to the Import From PO button if the supplier has active rows on existing purchase orders (hover over the blinking icon to see how many).
To import an item into an inventory receipt
Click Import From PO.
The Import from Purchase Order window opens and all active items on current purchase orders for this supplier are listed.
Tips
The Import from PO blinky is displayed only when adding an inventory receipt; you won't see it when you're editing one.
You can narrow the list of items by changing the criteria under Product Criteria (product, product type), Order Date Criteria (purchase order date), and Other Criteria (status, location, and active status) and then clicking Refresh List. If you have items selected in the list, clicking Refresh List (keyboard shortcut: F5)clears the listed items and replaces them with the new results. A message appears asking you whether you want to proceed. Click Yes to refresh the list and clear the lines, or click No to return to the Import from Purchase Order window and keep the selected lines (by not refreshing the list).
Change Import Location to receive the product(s) at a location different from the Purchase Order location.
Use the Show radio buttons (in the bottom right corner) to switch the data in the last column between Supplier Location and Product Type.
View Item previews the selected Purchase Order.
Select All selects all items shown.
Deselect All unchecks all items.
Check Include Expired Purchase Orders if you've chosen to allow importing from expired purchase orders, and want to do so now.
Expired purchase orders are listed in red.
In the first column with the check boxes, select all the check boxes of the items from purchase orders that you want to pull into the inventory receipt.
For products with Release Numbers, you can import the individual release numbers for an item or the entire item without a release number.
If you have not yet specified a Reference, it will be set to the imported Release Number.
Note
Each row in the list is an item (or a release number for an item) on a purchase order. The reference number indicates which purchase order the item belongs to; therefore, if multiple items have the same reference number, they exist on the same purchase order. When you link to them, the purchase order reference number displays in the Item list.
The Import Qty will default to the quantity ordered, but can be changed if not the quantity received.
Click Use Selected Rows.
The Import from Purchase Order window closes and the selected items are shown in the Add Inventory Receipt window.
If you do not have a Unit Cost specified for an item, a message appears reminding you that a unit cost is required for the item in order to save. Click OK to continue.
If you import a product with Associated Products but did not import the associated product(s):
if the associated product(s) are on the purchase order but not selected for import, you will receive a warning message letting you know the associated products were not imported and to double check the products on the inventory receipt
if the associated product(s) are not on the purchase order, the usual associated products rules apply (you'll be prompted to add optional associated products; mandatory ones will be added automatically)
If you imported a scaled good, click Scale.
The Scale Details window opens.
Enter the Gross Quantity, Tare weight, and Dockage, and agrē will calculate the Net Quantity and Clean Quantity received.
Click Update.
The Scale Details window closes and the Clean Quantity is copied to Quantity.
If you have chosen to import product from purchase orders with different Supplier Locations, agrē will default to the supplier location of the first product selected and will warn you of conflicting supplier location addresses.